Drawing a Female Illustration wit
One of the most difficult thing in graphic design is drawing a human portrait. In this tutorial we will teach you the technique of drawing a female illustration with the most basic tools of coreldraw, which is Bezier, Shape, Box, and Circle Tool. Learn how to create the human face with realistic eyes, hair & lips.

Tutorial Details
- Program: CorelDraw 11 - X5
- Difficulty: Advanced
- Estimated Completion Time: 1 Hour
Step 1 : Basic Elements
First of all you have to use CorelDraw with version 11+. In this tutorial I use CorelDraw X5, Okay lets get started. Let’s take a look at the basic elements used to create our design :Step 2 : Creating Worksheet
Okay, now that you know the steps and elements, we will begin, first of all open your CorelDraw program, now create a new file and set the paper size to A4 and the units to pixels.
Step 3 : Working with Bezier & Shape Tool
Now that we have our worksheet set, we will begin to create the Face, " Bezier " and " Shape tool " are the most important tool in this tutorial, make sure that you mastered this step before go to the next step,go to the " Bezier Tool " and create a custom shape similar like below, point and click to create the line and make sure that the first click is connected to the last click or else you can't put color in it.

After that go to the " Shape Tool ", right click on the upper middle lines and go to the upper toolbar, there you will find " Convert to curves " tool click in order to shape,
you can create a new corner / node by double click it.

Now in the corner you will see an arrow, drag the arrow to shape, use your feeling and make sure that you shape it like a human face.

Step 4 : Texture & Color
Okay now we are going to put color in the Face, go to the " Fountain Fill Tool " in the left toolbar, after you see a fountain dialog box apply the value below to create a skin color on the face.
Tips : You can create a custom color by double click on the color box.

Now that you have mastered step 3 and coloring, use the technique to create a neck for the face.
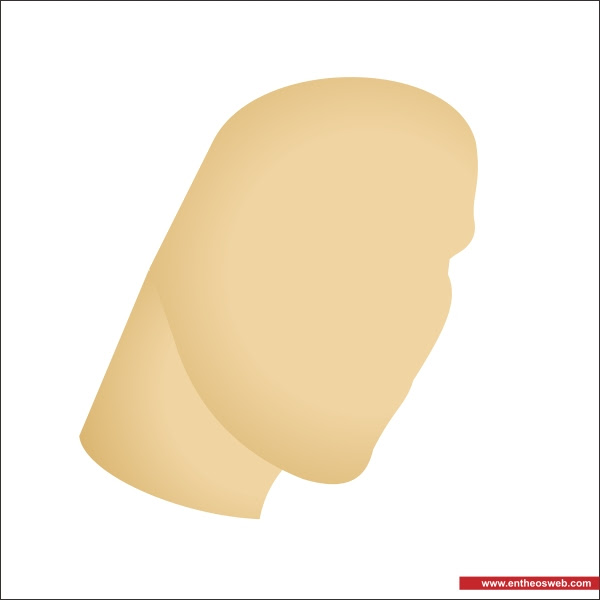
We will begin to create the texture for the Face, use " Bezier " and " Shape Tool " to create a custom shape similar like below, this will be our shadow of Jawbone.
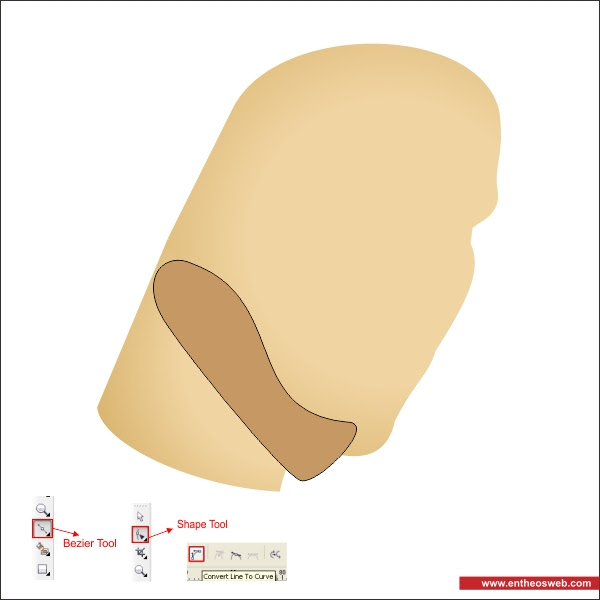
Okay now go to the " Transparency Tool " in the left toolbar, after you click it the cursor will turn into a black glass, drag the glass cursor from center to bottom to create a linear transparency.

After that create a base shadow for the eye using " Bezier & Shape Tool " similar like below.

Now using " Transparency Tool " make the base eye shadow transparent, by dragging the black glass cursor from center to right side.

After that create a nose bone using " Bezier & Shape Tool " similar like below.
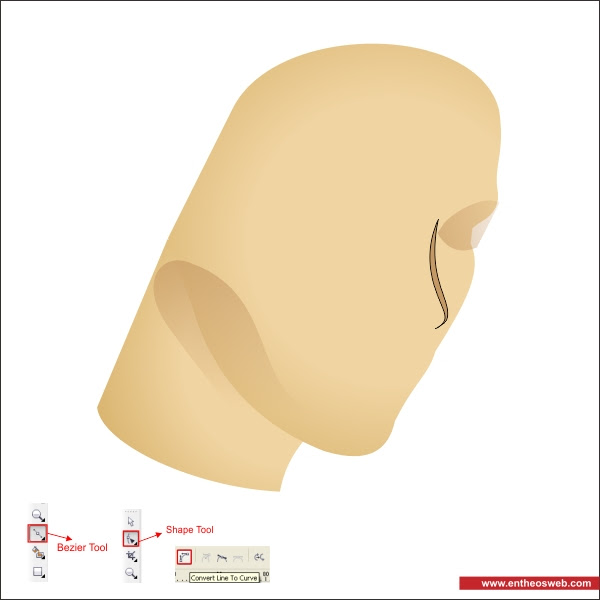
Okay now using " Transparency Tool " make the nose bone transparent, by dragging the black glass cursor from center to bottom.

Now that you got the idea, draw the rest of the Face texture using the same technique as above, make sure that you draw it similar like below.

Step 5 : Working with PowerClip
Okay now we are going to put the texture inside the Face using " PowerClip ", select all the texture and group it by pressing " Ctrl + G,after that go to the top toolbar and find " Effect > Powerclip > Place inside container ", now that the cursor are turning into an arrow click it on the face to insert the texture.
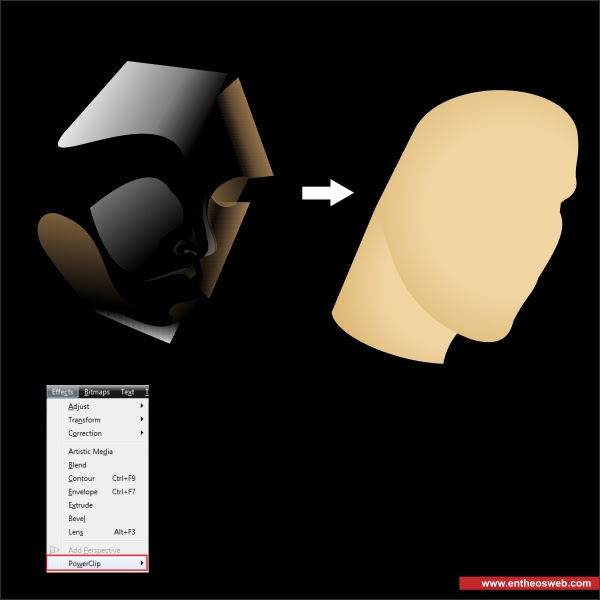
You can edit the texture inside the Face by pressing " Ctrl + double click ".

Step 6 : Creating the Eyes
Okay now lets create the Eye, go to the " Ellipse Tool " in the left toolbar and create a circle shape of any size, this will be our pupil.
Put color in it by go to the " Fountain Fill Tool " in the left toolbar and apply the value below.


After that go to the " Star Tool " in the left toolbar, in the upper toolbar set the corner into "60" and the sharpness into "20".
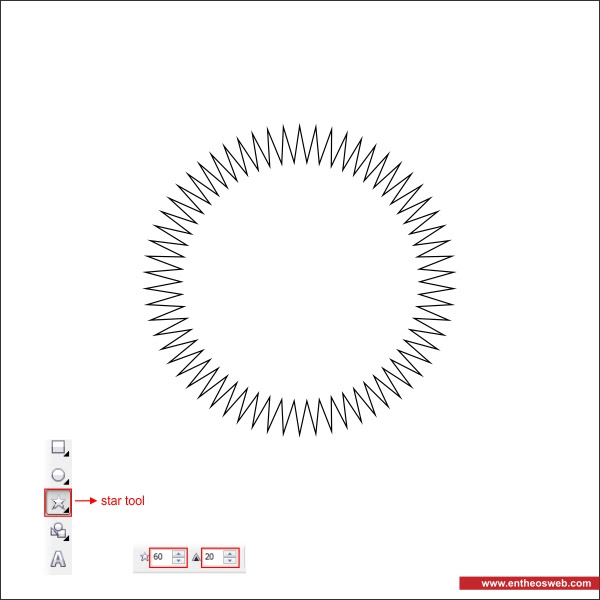
Put dark red color in it and arrange it on the center of the pupil.

After that using " Bezier & Shape Tool " create a wavy shape, and put red color in it similar like below, this will be the texture for the pupil.
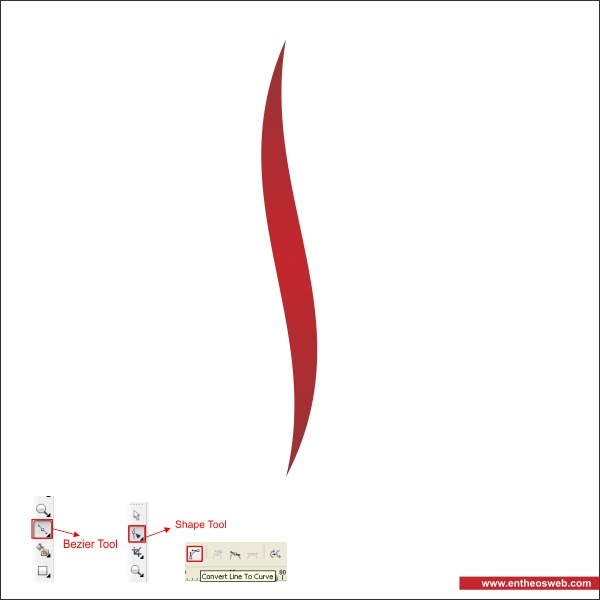
Now copy the wavy shape using " Left + Right mouse " while dragging it to the bottom.

After that group both of the wavy shape by pressing " Ctrl + G ", rotate and copy it by pressing " Left + Right mouse + Ctrl " while rotating it clockwise.

Okay now group it by pressing " Ctrl l+ G ", after that copy and resize it, make sure that the copied shape have smaller size and different color.

Arrange the shape into the center of the pupil.

Using the same technique as above, you can add more details into the pupil similar like below.

Okay now we are going to create the Eye body, go to the " Bezier & Shape Tool " to create a base eye shape similar like below.

Put silver gradient color in it by go to the " Fountain Fill Tool " and apply the value below.


After that create an Eyeliner for the base Eye using " Bezier & Shape Tool ", put black color in it.

Okay now insert the pupil inside the Eye using " PowerClip " same as step 5.

After that create two black curvy shape using " Bezier & Shape Tool ", this will be the Eyelash.

Now that you have two curvy shape, arrange the curvy shape into the Eyeline similar like below.

Copy and resize the Eyelash, following the flow of the Eyeline.
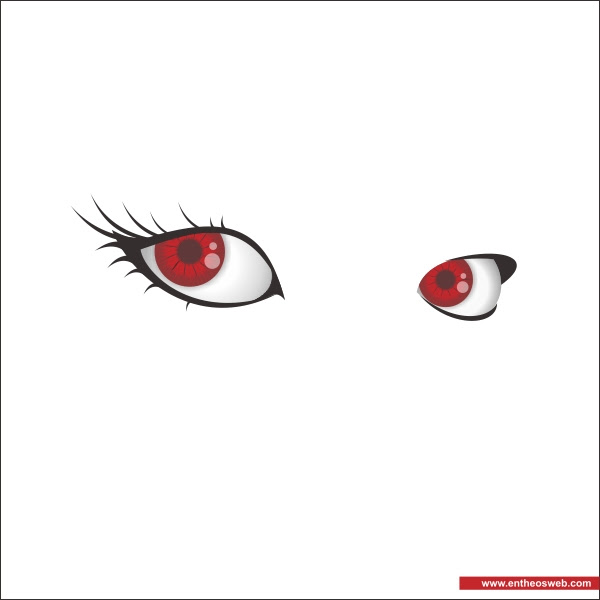
You can add as many as you like, but make sure you follow the flow of the Eyeline to make it natural.

Apply the same steps above on the other Eye.

Using the base two black curvy shape, arrange and resize it to make the Eyebrow.

Group it all by pressing " Ctrl + G ", and arrange it on top of the Face.

Step 7 : Creating The Lips
Lets create the Lips for the face, go to the " Bezier Tool " and create two custom triangular shape similar like below, this will be the upper and bottom lips.
After that make the corner of the shape to rounded using " Shape Tool ", use your feeling and make sure it shaped like upper and bottom lips.

Lets put red gradient color in it by go to the " Fountain Fill Tool " and apply the value below.

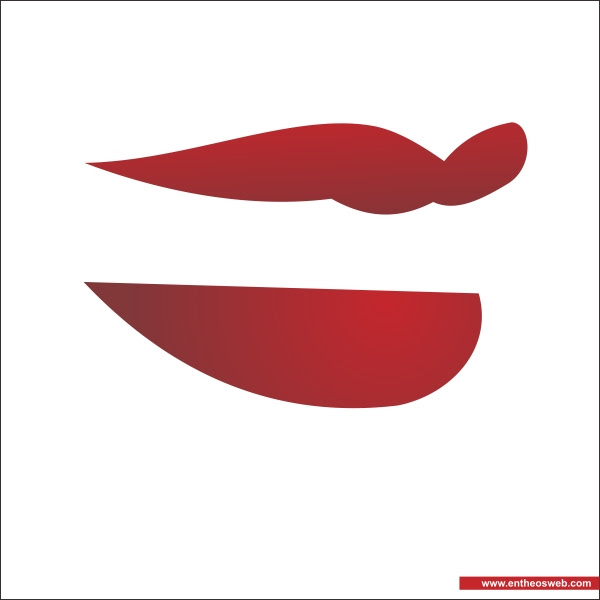
After that copy both of the upper and bottom lips, put white color in it

Now go to the " Transparency Tool " and drag the black glass cursor from top to bottom to create similar transparencies.
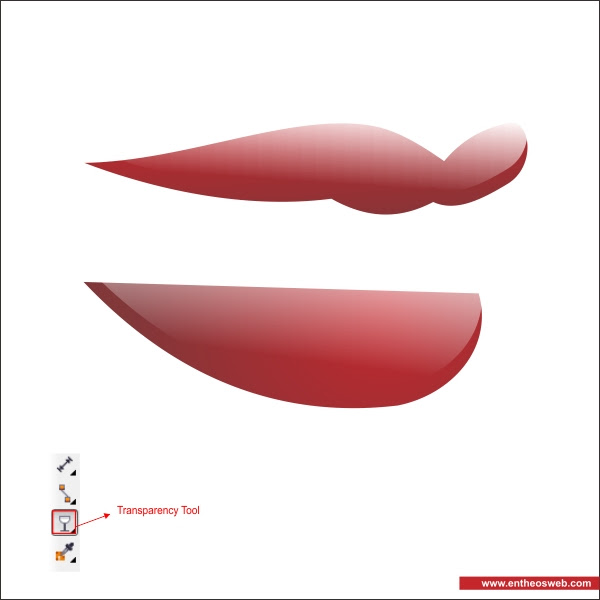
After that group the lips by selecting all of them and press " Ctrl + G ", arrange the upper and bottom lips so it match.

Now group all of them by pressing " Ctrl + G " and arrange it on top of the Face.

Step 7 : Creating The Hair
Okay now we are going to create the Hair, go to the " Bezier Tool " and create two custom shape similar like below.
Using " Shape Tool " drag the arrow on the corner and shape it like it form a base human hair.

Work on the edges and create more hair strands using " Shape Tool ", you can create a new corner by double click in it.

Put black color in it, and put both of the shape together so its looks like a base human hair.
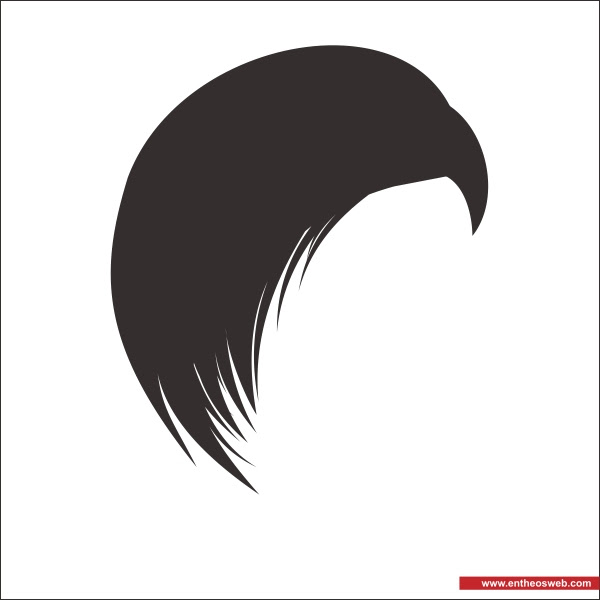
Using " Bezier & Shape Tool " draw a custom shape on top of the hair, follow the hair contour to create similar like below, this will be the hair shine.

After that put white color on the hair shine, and go to the " Transparency Tool " to create a linear transparencies.
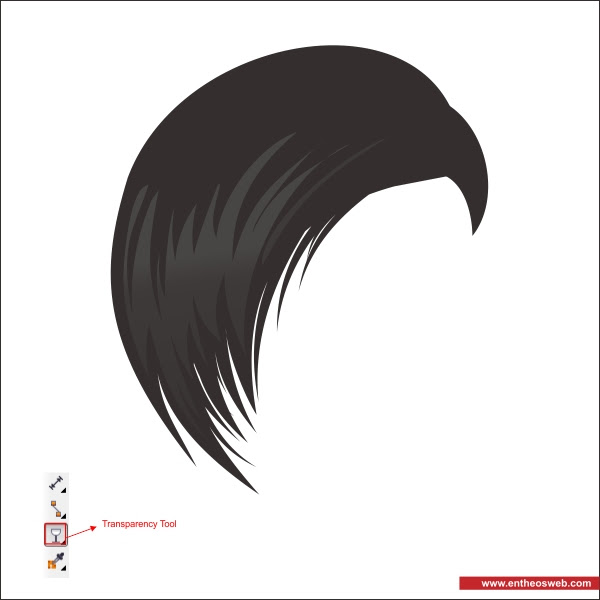
Group the hair by pressing " Ctrl + G ", arrange the hair on top of the Face that you previously created.

Final Image
And we are done, by using the same technique as above you can add more details to the Illustration to make it more natural like the final image below.
Drawing a Female Illustration with Corel Draw
One of the most difficult thing in graphic design is drawing a human portrait. In this tutorial we will teach you the technique of drawing a female illustration with the most basic tools of coreldraw, which is Bezier, Shape, Box, and Circle Tool. Learn how to create the human face with realistic eyes, hair & lips.

Tutorial Details
- Program: CorelDraw 11 - X5
- Difficulty: Advanced
- Estimated Completion Time: 1 Hour
Step 1 : Basic Elements
First of all you have to use CorelDraw with version 11+. In this tutorial I use CorelDraw X5, Okay lets get started. Let’s take a look at the basic elements used to create our design :Step 2 : Creating Worksheet
Okay, now that you know the steps and elements, we will begin, first of all open your CorelDraw program, now create a new file and set the paper size to A4 and the units to pixels.
Step 3 : Working with Bezier & Shape Tool
Now that we have our worksheet set, we will begin to create the Face, " Bezier " and " Shape tool " are the most important tool in this tutorial, make sure that you mastered this step before go to the next step,go to the " Bezier Tool " and create a custom shape similar like below, point and click to create the line and make sure that the first click is connected to the last click or else you can't put color in it.

After that go to the " Shape Tool ", right click on the upper middle lines and go to the upper toolbar, there you will find " Convert to curves " tool click in order to shape,
you can create a new corner / node by double click it.

Now in the corner you will see an arrow, drag the arrow to shape, use your feeling and make sure that you shape it like a human face.

Step 4 : Texture & Color
Okay now we are going to put color in the Face, go to the " Fountain Fill Tool " in the left toolbar, after you see a fountain dialog box apply the value below to create a skin color on the face.
Tips : You can create a custom color by double click on the color box.

Now that you have mastered step 3 and coloring, use the technique to create a neck for the face.

We will begin to create the texture for the Face, use " Bezier " and " Shape Tool " to create a custom shape similar like below, this will be our shadow of Jawbone.

Okay now go to the " Transparency Tool " in the left toolbar, after you click it the cursor will turn into a black glass, drag the glass cursor from center to bottom to create a linear transparency.

After that create a base shadow for the eye using " Bezier & Shape Tool " similar like below.

Now using " Transparency Tool " make the base eye shadow transparent, by dragging the black glass cursor from center to right side.

After that create a nose bone using " Bezier & Shape Tool " similar like below.

Okay now using " Transparency Tool " make the nose bone transparent, by dragging the black glass cursor from center to bottom.

Now that you got the idea, draw the rest of the Face texture using the same technique as above, make sure that you draw it similar like below.

Step 5 : Working with PowerClip
Okay now we are going to put the texture inside the Face using " PowerClip ", select all the texture and group it by pressing " Ctrl + G,after that go to the top toolbar and find " Effect > Powerclip > Place inside container ", now that the cursor are turning into an arrow click it on the face to insert the texture.

You can edit the texture inside the Face by pressing " Ctrl + double click ".

Step 6 : Creating the Eyes
Okay now lets create the Eye, go to the " Ellipse Tool " in the left toolbar and create a circle shape of any size, this will be our pupil.
Put color in it by go to the " Fountain Fill Tool " in the left toolbar and apply the value below.


After that go to the " Star Tool " in the left toolbar, in the upper toolbar set the corner into "60" and the sharpness into "20".

Put dark red color in it and arrange it on the center of the pupil.

After that using " Bezier & Shape Tool " create a wavy shape, and put red color in it similar like below, this will be the texture for the pupil.

Now copy the wavy shape using " Left + Right mouse " while dragging it to the bottom.

After that group both of the wavy shape by pressing " Ctrl + G ", rotate and copy it by pressing " Left + Right mouse + Ctrl " while rotating it clockwise.

Okay now group it by pressing " Ctrl l+ G ", after that copy and resize it, make sure that the copied shape have smaller size and different color.

Arrange the shape into the center of the pupil.

Using the same technique as above, you can add more details into the pupil similar like below.

Okay now we are going to create the Eye body, go to the " Bezier & Shape Tool " to create a base eye shape similar like below.

Put silver gradient color in it by go to the " Fountain Fill Tool " and apply the value below.


After that create an Eyeliner for the base Eye using " Bezier & Shape Tool ", put black color in it.

Okay now insert the pupil inside the Eye using " PowerClip " same as step 5.

After that create two black curvy shape using " Bezier & Shape Tool ", this will be the Eyelash.

Now that you have two curvy shape, arrange the curvy shape into the Eyeline similar like below.

Copy and resize the Eyelash, following the flow of the Eyeline.

You can add as many as you like, but make sure you follow the flow of the Eyeline to make it natural.

Apply the same steps above on the other Eye.

Using the base two black curvy shape, arrange and resize it to make the Eyebrow.

Group it all by pressing " Ctrl + G ", and arrange it on top of the Face.

Step 7 : Creating The Lips
Lets create the Lips for the face, go to the " Bezier Tool " and create two custom triangular shape similar like below, this will be the upper and bottom lips.
After that make the corner of the shape to rounded using " Shape Tool ", use your feeling and make sure it shaped like upper and bottom lips.

Lets put red gradient color in it by go to the " Fountain Fill Tool " and apply the value below.


After that copy both of the upper and bottom lips, put white color in it

Now go to the " Transparency Tool " and drag the black glass cursor from top to bottom to create similar transparencies.

After that group the lips by selecting all of them and press " Ctrl + G ", arrange the upper and bottom lips so it match.

Now group all of them by pressing " Ctrl + G " and arrange it on top of the Face.

Step 7 : Creating The Hair
Okay now we are going to create the Hair, go to the " Bezier Tool " and create two custom shape similar like below.
Using " Shape Tool " drag the arrow on the corner and shape it like it form a base human hair.

Work on the edges and create more hair strands using " Shape Tool ", you can create a new corner by double click in it.

Put black color in it, and put both of the shape together so its looks like a base human hair.

Using " Bezier & Shape Tool " draw a custom shape on top of the hair, follow the hair contour to create similar like below, this will be the hair shine.

After that put white color on the hair shine, and go to the " Transparency Tool " to create a linear transparencies.

Group the hair by pressing " Ctrl + G ", arrange the hair on top of the Face that you previously created.

Final Image
And we are done, by using the same technique as above you can add more details to the Illustration to make it more natural like the final image below.


0 komentar:
Posting Komentar